Editing RPI Operational Settings with EdRPI

|
| Contact: |
Ivan Galkin |
| Started: |
June 23, 1999 |
| Last changed: |
April 9, 2001 |
|
Contents:
-
RPI Commanding Overview
-
Version Control with CVS
-
EdRPI and jCVS Installation Guide
-
Working with EdRPI
-
Updating the latest versions of software and control data
-
Starting up EdRPI
-
Editing programs
-
Editing schedules
-
Saving changes to RCD file
1. RPI Commanding Overview
Commanding of RPI is complicated by the following factors:
-
substantial variety of RPI measurement programs
-
dependence of measurement programs selection on the spacecraft orbit
-
limited opportunity of communicating with the spacecraft from the ground
To avoid direct specification of each individual measurement start time
for many hours ahead, a concept of an RPI schedule is introduced.
One schedule allows to create a sequence of measurement programs with given
start times; this sequence is repeated in an "endless" loop, until the
time comes to switch to the next schedule. Thus, RPI can be supplied with
a set of schedules, each targeting a specific scientific goal, and switch
them appropriately as the spacecraft orbits Earth.
Specification of an automated RPI operation therefore includes:
-
design of measurement programs,
-
assembly of programs into schedules
-
specification of schedule start times (in MET, mission elapsed time).
Correspondingly, RPI stores in its computer memory three control data structures:
-
64 Programs
-
32 Schedules
-
256 Schedule Start Times (SST)
It is expected that programs and schedules will eventually become stable,
and only new SST tables will be occasionally uplinked to the spacecraft.
A period of mission time when RPI does not require any new control data
from the ground is called a "lights-out" period.
If by the end of a lights-out period no new SSTs are available to further
select schedules, RPI uses a set of default schedules #30, #31, and #32
that are designed to conduct a generic measurement sequence.
For further information please refer to RPI
Commanding document.
2. Version Control with CVS
A number of contributors are likely to design RPI programs, schedules and
SST tables. To facilitate an organized team work, one master set of RPI
controlling data structures is maintained at a central location, and the
contributors are given means for accessing the master set over Internet.
During the pre-mission period, any contributor is able to:
-
create (or bring up to date) a local copy of the RPI control data structures
to work with, and
-
update the master copy to reflect the introduced changes.
CVS (Concurrent Versions System) is a popular free version management system
available for many platforms, including all major flavors of unix, Linux,
Windows and MacOS. CVS orchestrates the work of individual contributors
making sure that none of the changes are lost, and any of the changes can
be rolled back.
3. EdRPI and jCVS Installation Guide
RPIAnywhere Suite installation
page gives instructions for many platforms. RPIAnywhere Suite inclides
EdRPI, jCVS, BinBrowser and PostPro1.
jCVS has to be configuired to work with the Lowell depository of RCD
files. (RCD files contain all relevant information on RPI operations.)
The following is the configuration steps:
-
Start jCVS
-
If a "Need Temp Dir" window appears:
jCVS is unhappy that the default temporary directory is missing during
the configuration. By default, it is "C:\TEMP". Please change it to something
more appropriate, e.g. "." (works even on the Machintosh!).
-
Left panel, click on folder "Work Bench".
-
Find a button "Add a new project" on the top toolbar. This is the one with
a red plus sign and a folder tree.
-
"Select a project to add" window appears (jCVS searches for the "Entries"
file.) Navigate to the folder "RPIAnywhere"--"WeeklyRCD"--"CVS" (the file
"Entries" is there, select it and OK it.)
-
"WorkBench Definition" window appears, with Brief Name "Weekly RCD". Set
Display Name to "Weekly RCD". This is just a screen name you will see in
your Work Bench.
Configuration completed.
4. Working with EdRPI v2.1
EdRPI is a utility capable of editing RPI control data sets and exporting
them in a format suitable for uploading to RPI. EdRPI works with a single
"RCD" (RPI Control Data) file containing programs, schedules and SSTs that
are individually timestamped, entitled and supplied with a contact person
information. A collection of RCD files may be kept under version control,
each targeting a specific mission period. The initial EdRPI distribution
set contains one RCD file, Intro.RCD.
4.1. Updating to the latest versions
Always make sure you are working with the correct (latest) version of RCD
files and EdRPI software. If you make changes to your local copy of an
RCD file whose master copy has been changed by somebody else, you will
not be able to update the master copy. Regretfully, at this time no reliable
mechanism exists that would merge your changes to the changed master copy.
So please update your local copies of RCD files before you start working
with them.
To update the local files to match the master files,
-
startup jCVS
-
Double-click on Weekly RCD project from your WorkBench.
-
Provide password (contact for
the password)
-
From the Project menu, select Update.
4.2. Starting up EdRPI
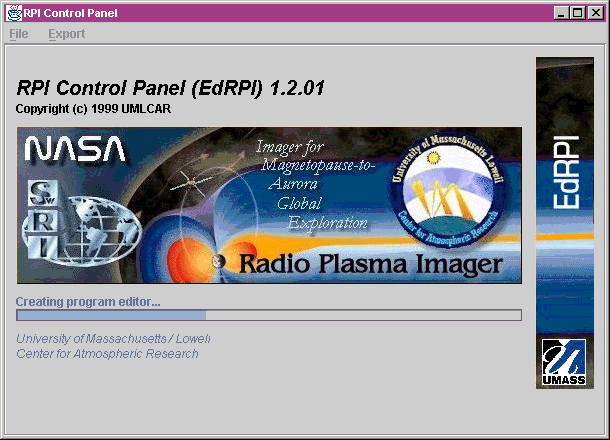 |
Depending on the computer performance, startup of EdRPI takes anywhere
between 5 seconds and 1 minute. A progress bar is provided to monitor the
loading process. After the loading is complete, the File menu becomes active,
with two enabled items, New and Open. Use them to open existing
RCD files or start a new set of RPI Control Data. |
4.3. Editing programs with EdRPI
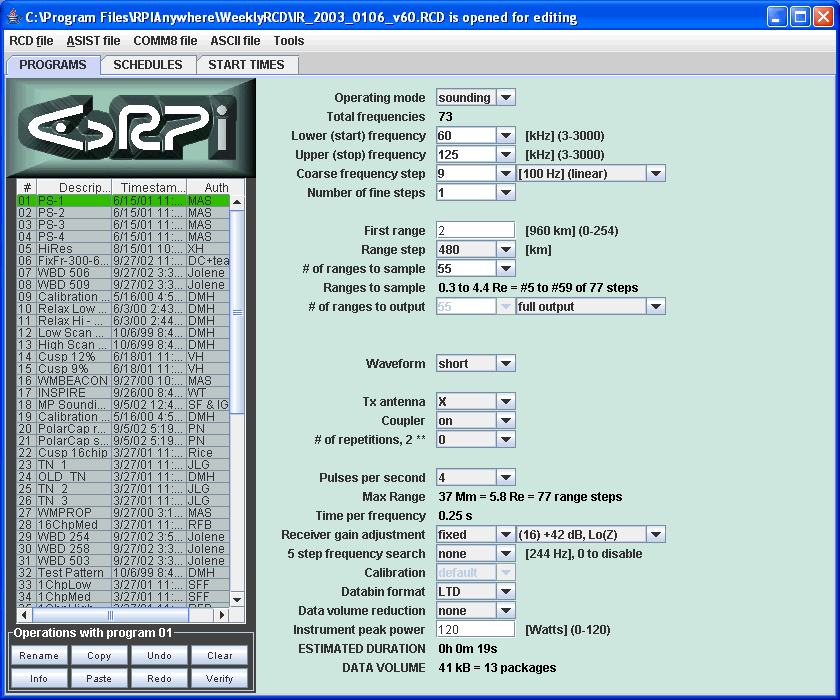
The Program Editor Panel consists of
-
left panel with a Program List table and two buttons Undo and Save
-
right panel with the Program Editor controls
Use the Program List to browse through the available (up to 64) programs.
Program examples can be found in the RPI
Commanding document. If you make changes to the program in the right
panel, you will have to either save them, or undo them.
Saving a program does not update the current RCD file. You can save
RCD file at any time from the File menu.
4.4. Editing schedules with EdRPI
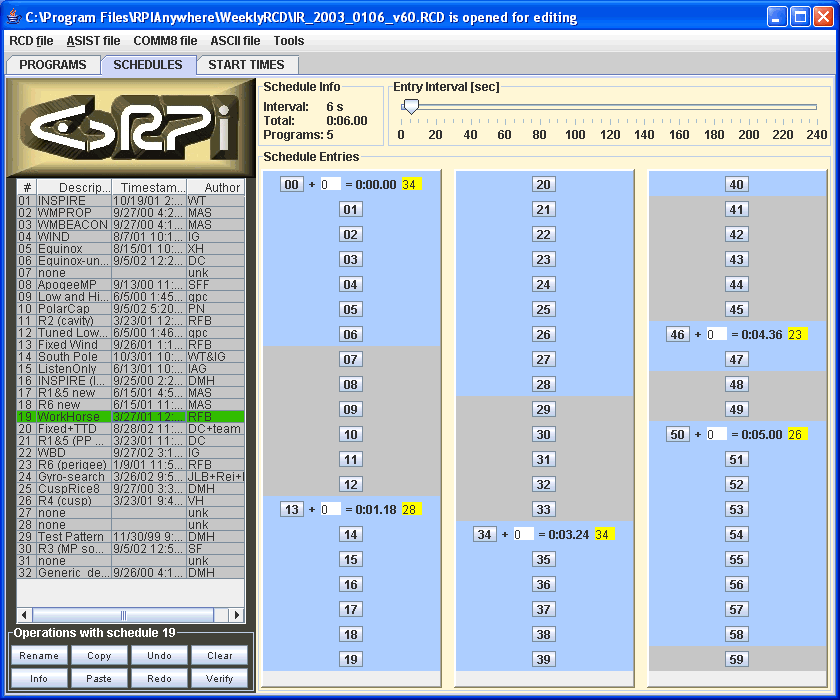
The Schedule Editor Panel consists of
-
left panel with a Schedule List table and two buttons Undo and Save
-
right panel with the Schedule Editor controls
Use the Schedule List to browse through the available (up to 32) schedules.
In each schedule, 60 entries are provided , arranged in three columns of
grey buttons enumerated from 00 to 59. A program can be scheduled to run
at any of the entries by clicking on the Entry # button.
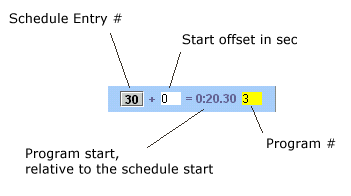
The program number is specifed inside the yellow text box. To fine tune
the time of the program start, a text field is provided to specify the
start offset in sec. The blue time label indicates the program start relative
to the beginning of the schedule period. This time is equal to (Entry-#
times Entry-Interval) plus Start-offset. The Entry-Interval is selected
using the slider on the top of the schedule editor.
The estimated duration of the program is used to indicate portion of
the Schedule Period taken by the program. If two programs are overlapping
in time, the conflict will be shown in red. Programs can be removed from
the schedule by another click on the Entry # button.
If you make changes to the schedule displayed on the right, you will
have to either save them, or undo them.
Saving a schedule does not update the current RCD file. You can save
RCD file at any time from the File menu.
4.5. Saving changes to RCD file
Changes made to programs and schedules can be saved to an RCD file from
the File menu, using Save and Save As options.

